Wednesday, July 28, 2010
Moving
I am preparing to move apartments, and everything should be ready by Saturday. Will post pics of the new "workshop" as they become available.
Saturday, July 24, 2010
Restrospective Thoughts On The Pressboard Template
The Thing About Pressboard
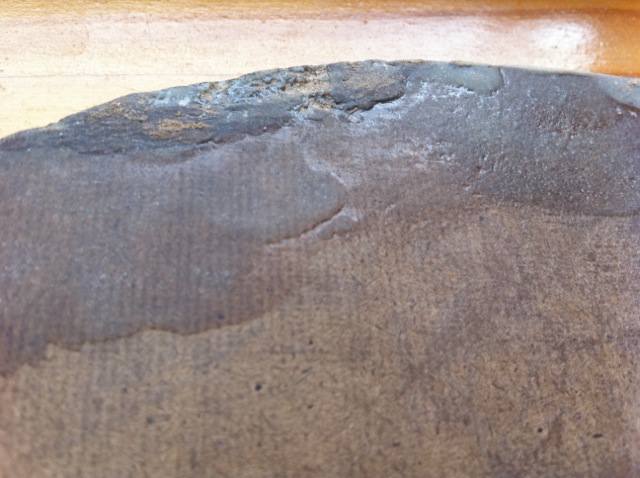
Pressboard is kind of amazing because it is literally paper that has been compressed to the point that it has the consistency of a really soft wood. The disappointing thing about pressboard, though, is that it is extraordinarily sensitive on the edges.
I, uh, had my template resting on my fire escape and some wind blew it away. It plummeted 3 stories and was whacked against pavement a couple of times. This basically created a bulbous cauliflower-like dent in one of the rounded bout edges, undoing the paper layers, and now the template is unusable without some serious gluing and sanding. But even then, why put in so much effort for a template that'll just fall down again?
Use Wood?
Perhaps I'll try another template, but this time, I'll use a harder wood. Also, this might either require a jig saw for faster cutting, or a finer blade for the coping saw.
Friday, July 23, 2010
Creating The Template

Template Design
So I decided that I need to try some sort of work out and see how suited I am to working with tools. At the same time, I wanted to try something simple and inexpensive, so I decided to fashion the guitar template. I had already created a diagram about the dimensions of the template (following Guitarmaking) that you can see on the right. Note that in the book, the author only provides the precise length of the upper bout (6.875") but the positioning of the lines denoting the bout widths are not specified. I decided to eye-ball it -- it is "my very own", isn't it? As in the diagram, I placed the upper width line (5.875") slightly above the center of the upper bout section. I placed the lower width line (8") about 2/3 of the way down the lower bout section. Just eye-ball it, everything will be fine. I hope.
Tools and Materials

I went to my local lumber/hardware store in Astoria and purchased:
- a 36" metal ruler ($4),
- a 8" 200 nm general purpose mill file ($8),
- a run-of-the-mill Stanley coping saw ($8)
I also had some 1/16" and 1/32" precision rulers lying around. I also needed pressboard for the template material, so I stopped in the warehouse and asked. They cut me a 24"x9" piece of pressboard and just let me take it away. I'll get them next time!
Measuring and Drawing
Ah, how quickly one forgets his school days and
how much of a pain in the butt is measuring stuff with a ruler. I tried the absolute best I could, but even so, the pencil marks were thick and I constantly had to re-measure my lines. It's virtually impossible to get a proper right angle without a square, but I improvised with a heavy piece of wood that I had: I would prop it against the trued edge of the pressboard and then place the 36" ruler flat against the straight edge of the wood block. (That's the black wine bottle holder in the picture.) In the end, it was not clear whether the pressboard itself was off-kilter or the tools were imprecise (probably the latter).

Also, I noticed eventually that the 36" ruler had some extra space ruled out on one of it's ends, creating an error of as much as 1/8".
I sketched the curves out by hand, as prescribed, and then thickened the lines. I found a soft artist's eraser I had lying around to be handy for erasing erroneous pencil marks from the pressboard. All of this was fairly quick, probably about 30 minutes with all the marking and erasing and remeasuring.
Time To Sew... I Mean, Saw
I had to saw in sections, or else the coping saw would get stuck. In the next picture, you can see the first section coming off. The saw has this switch where you could change the angle of the blade and this really comes in handy sometimes when your saw is heading for a close call and you need to rapidly change direction.

As you can see I stayed pretty far outside the lines because I was really afraid of ruining the project. Later, when I became acquainted with the speed of filing and felt more comfortable with my control of the saw, I went back and trimmed some more off the edges.
This sort of saw generally is pretty violent to the edge of the pressboard, and the cut comes out rather rough. Of course, another problem was that I didn't have any sort of clamp and had to hold the template down with my hand. This resulted in the saw jumping occasionally. Note to
self/users: get yourself at least some kind of clamp.

Filing The Edges
After doing this for a while, it became apparent that (a) it would be pretty difficult to get a nice smooth curve in the waist (that is, that ingroove between the two bouts) with a flat file, and that (b) using this sort of rough file wasn't going to result in nice, clean edges. Therefore, I had trudge back to the hardware store and buy:
- a rounded file ($5),
- a fine sand bar ($2).
I didn't buy sand-paper because that shop didn't have anything to put the sandpaper on. The sand bar worked beautifully and the edges came out pretty smooth.
Almost Done
Here is the almost-finished product, just needs some finishing touches.

Thursday, July 22, 2010
A "Cumpiano"-Style Guitar Workboard
 From a forum, here is a picture of the guitar workboard described in Guitarmaking.
The forum poster writes:
You don't need a mould to build a guitar. The traditional Spanish method, used by most of the great classical and flamenco builders of the 20th century, is to assemble the instrument freeform on a flat workboard, or "patron."[...]The cork and paper "shim" on the top of the patron is designed to allow for the slight arch cut into the bracing of most classical soundboards.
It's a proven method, well suited to small shops with few power tools.
Here's Cumpiano himself, building a koa steel string.
Acoustic Guitar Shapes
 I started being a lot more conscious of the different shapes of the guitar, and now dreadnoughts and auditoriums just kind of jump out at me where ever I go.
 Yesterday, I was in (ugh) Guitar Center on 14th Street and I tried out the kind of shape I'm thinking of building. It's cool, but a little bit smaller than what I am used to. I also don't think that not having a cutaway is going to be a big issue as I rarely play in that area anyway (perhaps, unfortunately).
Also, in GC they had an acoustic whose side was actually sawed off so you an inspect the insides, and it gave me a pretty good idea of the real-world thickness of the soundboard. Cool!
Wednesday, July 21, 2010
More Detailed Overview of the Soundboard Construction and Tools List
 Here's a great and detailed overview of joining the soundboard and bracing it.
What a great resource! He goes through the whole thing in great detail, from examination of imperfections, down to the joining mechanisms. I'm going to take some notes here.
Materials
- A bookmatched guitar top blank. The "top blank" are the two plates that will be joined together to create the soundboard. "Bookmatched" just means that the pieces are mirrored and otherwise identical.
- Yellow glue. I'll have to return to the discussion of which glue is best.
- Brace and patch stock. This is the wood that will make the braces on the inside of the soundboard.
- Assorted cauls.
Tools
- A bench plane. This will be used to reduce the top to the proper thickness and to smooth the joint between the plates for better gluing.
- A shooting board. (See image.) Since I'm not going to be able to afford/house a proper jointer, we'll need a method to create the joint evenly. We'll return to reassess whether we need a shooting board a la Guitarmaking.
- Carpenter's framing square.
- Assorted clamps.
- Razor saw.
- Chisels and (woodworking) knives.
- It seems like having cabinet scrapers will be a good idea, too.
I'm beginning to understand, without ever having touched one in my life, why the planes come in different sizes. The larger numbers seem to be larger and are better suited for larger pieces of wood. Imagine using a tiny, tiny plane on a huge, huge wood surface. It is likely you are going to work unevenness into the wood.
And speaking of bench planes, check out this video about how to use one:
Tuesday, July 20, 2010
Thinking About The First Steps and Wood Selection
 After doing a whole lot of reading, I think it will be natural for me to start with the sound board and back of the guitar. Both the top and back plates of the guitar start with two wooden boards, joined together by glue and the process is similar for each plate.
The other thing about starting with the plates is that it will require a lot of the basic woodworking tools to get going. I'll need glue to join the plates, a hand plane to reduce the sound board to the desired thickness, some sanding materials to smooth it, and a caliper to check the thickness. There are several approaches as to how to afix the plates together. AGB followed Guitarmaking and built a shooting board (first image), meanwhile JSevy (second image) has a neat setup using only a surface, wedges, and cauls (those planks across the top). One thing is for sure, and that is that I'm going to need tons of clamps to perform this gluing operation. When the top and back plates are joined, I'm going to need to cut out the rough shape of the guitar, and this will require either a coping saw or a band saw.

Another thing that I wanted to think about is the wood materials to use. Everyone seems to be using spruce for sound boards, but upon examination of what is available, it seems like there are thousands of varieties and price levels of spruce.
There is an in-depth discussion of sound board wood at Goodall Guitars; the substance here is that Sitka spruce is very strong, with good balance between the frequencies, and is suited for pick-style playing, while Cedar or Redwood is much better (louder) for finger-style playing and is generally less strong.
Stewart-MacDonald has sound board top sets. They come as two pieces, sanded down to .125-.030" (which, I understand from AGB, might be a little too much) each measuring 8.5" x 21", with so-called "master grade" going for about $90. Allied Lutherie also has Sitka spruce tops for about $20 less, as well as more expensive European spruce. I'll have to look into that. Over-all, it seems like spruce is going to be the choice for the sound board.
Now for the back. An interesting note, from a forum, that I found regarding the wood composition of the top and back:
Now, here's the sticky wicket in regards to using tops and backs and sides all from the same type wood. If the top creates a tone or frequency that it resonates at, and the back resonates at that same frequency, you will end up with a cancellation of certain overtones and harmonics. Also known as wolf notes. This happens a lot in violins, cellos, and instruments of that sort because of the constant tone created by the bow and that the top and back are coupled together with a sound post.
So, the wood should be different -- but what kind? From Petros Guitars:
The harder the back wood is, the less energy it absorbs and so the less it vibrates. The less it vibrates the more it projects. The cost of great projection is reduced tonal color as contributed by that wood. Conversely, softer woods vibrate more and produce great tonal color, but project less well.
So, hard back tone woods:
Soft back tone woods:
- are heavier,
- vibrate less,
- effectively focus energy to the top and, therefore,
- project powerfully.
- are lighter,
- vibrate more,
- focus less sound to the top, but,
- contribute to more evocative color and tone.
He also goes on to say that, basically, soft backs shouldn't be paired with hard tops. For Alaskan Yellow Cedar, Mahogany, Koa, Sapelle, and Claro Walnut, don't go above Sitka spruce in sound board hardness. East Indian Rosewood and Sitka are a tremendously popular combination, which naturally turns me off just a little bit. Black ebony sounds exotic and dangerous and is going for about $165 for the set, but I might have to hold off on this decision because strange woods might offer up strange problems when the time comes to bend the sides.
A Java Application For Rosette Generation
 The rosette is the circular artisanal lining of the guitar's sound hole. One way of making rosettes is by gluing together little square column logs of different colors, cutting them into slabs, and shaping the slabs into a circular pattern around the sound hole.
To facilitate this process, I can use one of these cool Java applets.
Monday, July 19, 2010
More Anatomy and Construction Overview
 I went over some diagrams such as the one on the right. I've been playing around with guitars for a number of years so I already knew most of the parts. I didn't know: bouts, heel, and saddle. Also, the head stock is also called, simply, the head. The rib I have heard referred to as a just a side. The top plate of the guitar, the one with the sound hole, is the sound board, and the bottom plate (the one typically made out of exotic woods -- ooooh!) is the back.
So a high level view of a guitar is that is made out of five parts -- a front plate and a back plate, two curvy sides, and a neck.
The Sound Board
The sound board is the more complicated plate. It has a sound hole, and a decorative rosette around it. That would be the circular inlay of artsy wood or abalone (pearly sea-shell) that you typically see. The soundboard is reinforced from the inside with braces that are specially shaped and placed for optimal tonal characteristics; they also give strength to the front.
The Back
The back is usually made out of two plates of a nice wood, joined together and also braced from the inside.
The Sides
These guys are bent into their proper curves using something called a bending iron, which is simply a hot, round section of metal pipe that you rub your sides against after soaking the wood and eek out the curves that you need.
The Neck
The neck itself consists of a number of different pieces joined together in special formation. I suppose we'll return to this in detail.
Basic Anatomy, Body Styles, Dimensions, and Bouts

See Buying an Acoustic Guitar for a basic discussion of exterior anatomy, body styles, and types. This buying guide also discusses the effect of various woods on the sound of the intstrument.
I learned that my Takamine G Series guitar that I've had and used for years is, as it turns out, a cutaway dreadnought. This is not the body type that we'll be building, however; we'll be focusing on the slightly more pleasantly curved "Auditorium" size. I like that this is one of the larger-dimensioned models, because having a big guitar in your hand is sort of like having a big machine gun.
Notice that on each side of the guitar there are two curves -- the lower, larger one and the upper, smaller one. These are called bouts and the width across the upper and lower one (along with the curvature) are what creates the shape of the guitar. This will come into play in a little while when we create an outline of our guitar template.
Resources For Guitar Building
Books
- Guitarmaking: Tradition and Technology
- Build Your Own Acoustic Guitar Said to be a good visual companion to Guitarmaking.
Sites
- Building An Accoustic Guitar In Your Kitchen A reasonably detailed presentation of the steel-string guitar building process from Guitarmaking, with minor deviations from the process
- Hoffman Guitars -- Building A Guitar An outline of the steps, one by one.
- Building An Acoustic Steel-String Guitar Tons of amazing pictures and closeups, and a fantastic final product.
- Luitaio Mottola Awesome and very detailed, with lots of pictures. Much experience to be taken away from this site.
Videos
Let's Build An Acoustic Guitar
I recently became fascinated and, perhaps, obsessed with the idea of building a guitar. That is, building a guitar from wood. It seems an impossible task -- complicated and intimidating because it requires all sorts of strange tools and wood-working skills.
I've never "planed" a piece of wood in my life.
But I was inspired by this gentleman's blog and his bravery for doing it in the kitchen of his tiny condo, and especially by his short list of essential tools. I must have read that blog five times through, pouring over and over it and cross-referencing with Wikipedia definitions of various tools and techniques.
Shortly, I went out and purchased the recommended reading. This is a good book, with an extraordinary level of detail.
I will be entering the research stage now, where I will learn everything I possibly can about the process, tools, and techniques. Then I will slowly start to build, purchase, or otherwise acquire the tools and materials. Stay tuned.
Subscribe to:
Posts (Atom)